How to Upgrade the StarryHub System to StarryOS 5.1?

Introduction
Czur StarryHub is a revolutionary video conference system for businesses. Unlike other traditional solutions, It integrates the projector, FHD camera, microphone array, and speaker system into one place.
Table of Content
1. What is StarryOS?
StarryOS is the core operating system of the conference projector StarryHub, designed specifically for small to medium-sized enterprise teams requiring efficient remote collaboration (20-30 people). Based on Android, StarryOS is compatible with most video meeting apps (such as Zoom and Microsoft Teams). It features a camera that supports up to 4K resolution and a high-performance microphone, delivering ultra-clear visuals and high-fidelity audio to ensure smooth and crystal-clear video conferencing. Additionally, the system supports zero-setup without complex configurations. StarryOS provides businesses with a convenient and reliable solution for virtual meeting rooms.
2. How to Upgrade?
CZUR is committed to continuously enhancing our products to provide the best user experience. StarryHub is performing a major version upgrade from the current StarryOS 4.3 (based on Android 7.1) to StarryOS 5.1 (based on Android 12).
The upgrade to StarryOS 5.1 can only be detected and performed after upgrading to StarryOS 4.3.
Therefore, users who wish to upgrade need to first update to StarryOS 4.3 to receive the upgrade prompt for 5.1.
Here is a step-by-step guide to upgrade the StarryOS 5.1:
2.1 Devices required
-
StarryOS 4.3 version
-
Windows Computer
-
Double Ended USB Cable
Note: if you use CZUR cables, please make sure the ‘typeC+USB port’ connects to the computer.

2.2 Upgrade Path:
To upgrade from StarryOS 4.3 to StarryOS 5.1:
Click the upgrade notification in the top-right corner of the desktop (or the "Discover New Version" option on the second page). Follow the on-screen instructions to complete the upgrade process step by step. And you can check the following step-by-step guide:
2.3 Upgrade Step-by-Step Guide
Step 1: Locate the upgrade option. Click StarryHub 5.1 Version (top left corner) → Check → Upgrade.

Figure1-Upgrade path
Step 2: Download and install the upgrade tool StarryHub Tool 1.0.2. on CZUR.COM
Visit CZUR.COM to download the tool: Navigate to Download Software → Q1 Pro/Q1S Pro → Product Software → StarryHub Tool 1.0.2.

Figure2-Download Software
Step 3: Connect the double-headed USB cable to your computer and the USB 2.0 port on the StarryHub device.
Step 4: Open StarryHub Tool 1.0.2 on your computer. Click “Start Upgrade” and wait for the device testing to complete. Then, select the “Click to Download” option and allow a few minutes for the firmware to download and install.

Figure3-Start upgrading

Figure4-Click to Download
When complete the download, you will see two buttons backup data and Start Upgrading again. Click “Start Upgrading” (if no backup is needed), next, click “Update Immediately” and wait for the Update completed in 5 minutes.

Figure5-Start Upgrading

Figure6-Update Immediately
NOTE:
-
After entering the upgrade, the StarryHub enters burning mode, and the screen goes out and the power indicator light is red.
-
Do not disconnect the USB and power supply throughout the entire upgrade process.
-
Avoid performing any actions while waiting.
When your computer shows the 'StarryHub Upgrade Completed' screen, StarryHub System will be on version 5.1. Once the upgrade is complete, StarryHub will automatically restart.
3. StarryOS 5.1 VS 4.3: New Features
-
Enhanced Compatibility with Android Apps
With the upgrade to Starry 5.1 (now based on Android 12, compared to the previous Android 7), the system supports a broader range of newer apps.
- Fresh Desktop Wallpapers Added
The system includes a selection of built-in wallpapers for users to choose from and now supports custom wallpapers with a recommended size of 1920 x 1080.
How to set: Settings → First Screen Seeting → Wallpaper
Custom Wallpapers: Easily upload your wallpapers from local storage or the internet to create a unique look.

Figure7-wallpaper
- Automatic App Launch
Users can select an installed app to automatically launch upon startup. Once set, the app will start every time the device powers on. Additionally, users can add apps to a frequent list.
How to set: Setting→First Screen Setting→Start when StarryHub is Powered on/Frequently-used App

Figure8-Start when StarryHub is powered on
- Custom Logo
You can customize the logo on the top-left corner of the desktop.
How to set it: click on the text area to edit it, and keeping it blank will revert to the default logo.

Figure9-custom logo
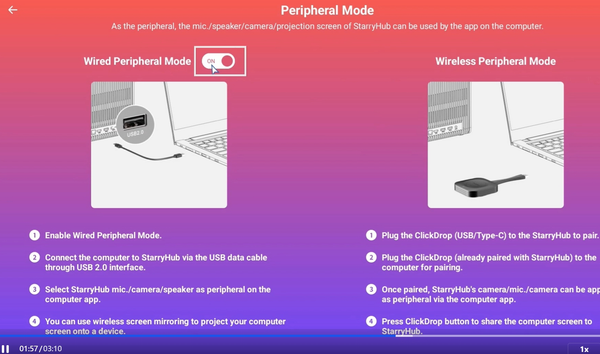
- Added wired USB Peripheral Mode
-
Connect the computer to StarryHub via the USB data cable through the USB 2.0 interface.
-
Select StarryHub mic./camera/speaker as a peripheral on the computer app.
-
You can use wireless screen mirroring to project your computer screen onto a device.
How to set: Desktop→Peripheral Mode→Wired Peripheral Mode

Figure10-peripheral Model
Instructions: With USB peripheral mode enabled, connect the computer to StarryHub via the USB 2.0 port using a data cable. The computer will then be able to select and use StarryHub’s camera, microphone, and speakers. The USB peripheral mode provides a stable connection, eliminating network lag and delays, and ensuring a smooth and highly efficient meeting experience.
- Other Tips
-
Optimized navigation bar display speed (resolved the issue where the bottom button
unintentionally triggered system navigation when using some conferencing software).
-
Added support for installing .xapk file types (previously, only .apk files were supported).
-
Enhanced the shutdown animation (replaced the progress bar with a StarryOS-style animation).
For more details, please watch our step-by-step tutorial video for detailed guidance:
4. FAQs of StarryHub System 5.1?
1. How to find the upgrade guide?
Find the update notification in the top left corner of the homepage. You can also swipe on the TouchBoard to view it on the second page.
2.How to confirm if StarryOS has been upgraded to version 4.3?
Enter the "Upgrade" interface to check: Setting→System → Upgrade


